
Sweet Naiveté
In the midst of 1ar-fe swapping my 1996 RAV4, I wanted to give the transmission a refresh. In the previous post I noted how 2nd and 3rd gear synchro engagement teeth were fairly worn. I decide it’s in my best interest to replace those two gears, as well as their respective synchronizers.
The soft unsettled quiet from a million questions never answered
For some context, every manual 4wd first gen RAV4 had an E250F transmission. The 2wd versions were the E250, which is effectively the exact same thing but without a transfer case and having a slightly longer final drive. The E250F is not super common so its not generally a matter of walking into a junkyard and finding another one.
Expecting conversational return more akin to diapason
Anyway. Continuing to order parts. The 2nd gear for the 1996 RAV4 is part number 33332-42010. However, this part is NLA, with no supersession. Rats. I can’t just change to a different ratio, because the driving gear is actually machined onto the input shaft, and so is 1st. So whatever happens I need to have a matched 1/2 gear. Looking around, there is one other narrow case transmission with a 1.913 2nd gear, the E359F. 04-05 2AZ RAV4 manual AWD. Rare car, but checking the part number, 33332-20190 is still available. Weirdly enough, this shows compatibility with the 2000 E250F. Sweet. The synchro ring is still available for the 1996, and that is 33038-12012. 2nd gear checked off the list.
3rd gear as it turns out is in a similar situation. 33034-42010, for the 1996, NLA. The E359F happens to have the same 3rd gear ratio again, 1.258. 33034-20110 to the rescue. The 3rd synchro for the 1996 is also still available, 33039-12011, but for some reason it’s about five times the cost of the 2000 E250F/2004-5 E359F synchro, 33369-28011. So I order the later one.
Hope for reason fades away
All of the decisions made here turn out to be flawed. I’m exploring “new territory” here. This is my first real dive into the narrow case platform, and my first time doing any serious rebuilding work in a transmission. In my experience with MR2s, it seems the wide case transmissions were pretty one-directional. Once an update was made, it was carried through to the end. With the early E153s and the older wide cases (E51, etc.) they were all single synchro transmissions. In ~92, they got updated to dual synchros. The E153, E53, and a few of the Celica GT-FOUR transmissions were updated around that time. Then again later in 1998, 3rd and 4th got another update. This carried through in the JDM MR2s and the 1MZ Camrys. My point in making this is that a lot of E250F and later narrow case parts are shared with the late wide cases. A bunch of synchros are shared, synchro hubs, sleeves, bearings, etc. I naively assumed this applied to all future transmissions. This will become apparent that it’s not the case.
A hint of heartache in it's place
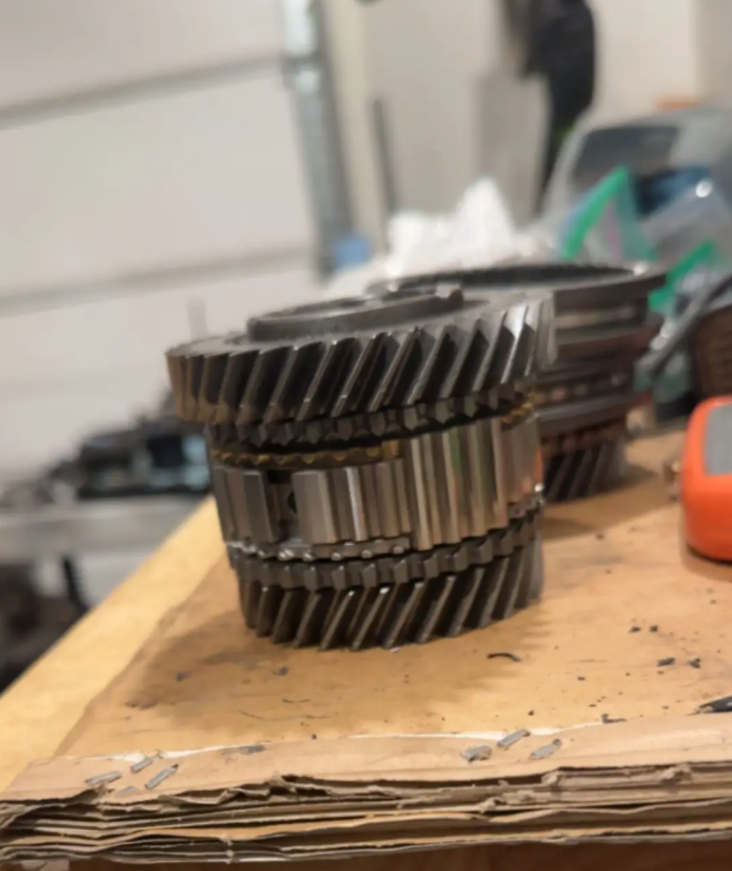
First disassembly time. I start with the output shaft for no particular reason. Press off the rear bearing, 4th gear, and you can press 3rd gear off with 2nd. Done with the press, time to just install the new synchro and drop the new 3rd in place. But it doesn’t just fit right, it doesn’t drop into place. some disassembly, finagling, cursing, questioning my sanity, I came to the conclusion that the “new” 2nd gear has a larger taper on the inner friction surface, by only a few thou. Not only that, but the dog drive pattern is actually different between the two. In order, the old gear+synchro, the new gear+synchro, the old gear+friction surface, the new gear+friction surface. So basically this synchro at the least is unusable to me.


Gone is the time when I could survive nursing on a sweet naiveté
Well, I’ll pause on that one for a bit. Let it marinade to see if I can come up with a solution. On to 3rd gear. Press the input shaft rear bearing off, 4th slides off, then the synchro hub can be pressed off with 3rd gear. When I take it off, I notice that weirdly, the older gear design was a multi-cone synchro design, whereas the new one going on was actually only a single cone. I don’t know why they switched away from it, probably bean counts if anything. Beyond just that, the new gear won’t actually fit against the synchro hub, the friction surface ends up sticking up too far. This may be remedied with some lathe time, but I don’t know what this stuff is made of so I don’t know if it requires special tools or if they are heat treated.


Waiting for you
Looking up pictures online, it seems that the 2nd gear synchro from the newer cars, 33038-28010, is of the same design as the older synchro, but with the correct taper size. This hopefully means I don’t have to modify the synchro hub for 3rd/4th. Well, that’s ordered. More time spent waiting. Yay! Instead of going to the dealer this time I actually tried ordering from some Dubai eBay seller, and the parts actually arrived in only 5 days. I might have to try that more often. They’re definitely OEM parts, just neat they showed up that fast from halfway around the world.
But I'll still hold on hope
Not too surprisingly, the new 2nd gear synchros look pretty different (The top gear is the new model, the bottom is the old model). But it actually fits against the gear, so that’s nice. Somewhat surprisingly, it actually fits in the synchro hub properly! This means I can actually finish putting the output shaft together.


As frail as the evening's ghostly gloam
I’ve always used presses on transmissions before, but I dont have one at home and wanted to try the take-and-bake method today. 3rd and 4th are normally pressed on, it’s an interference fit on the splines. Of course, metal expands when heated, so I stuck them in my toaster oven at 350F for 20 minutes, and they dropped about halfway down the splines. Took a few light taps with a hammer and a press sleeve, but they’re all on in one piece now. That means I can actually do the output shaft tapered bearing preload setup and hope that I don’t have to buy more shims from Toyota.

Excuse the lighting
Staring ‘til the stars align
I heated and pressed the new output shaft bearings onto the output shaft (duh) and went to do bearing preload. Spec is 6.9-13.9 inch pounds for new bearings, and I was bang on around 9in*lbf keeping the same shims. Less is better, but in spec is in spec. More preload makes the thing quieter, less makes it more efficient. These will only wear in with time so I’m comfortable with 9. I had two other E series I could take apart and steal shims from, one was already apart (the empty one I stuck in the car), and that shim was way too small it ended up having zero preload. That would have been interesting to run but I’m not sure how I feel about that, so I will keep the same shim.
Gone is the time when I could survive nursing on a sweet naiveté
The next hurdle to overcome was deciding what to do with 3rd. It has been a while so I reassembled it to refresh my brain. The lip on the input shaft is what the synchro hub bottoms out against, and the lip on the gear is where the gear rides against the hub. The shape of the input shaft has not changed with the newer models. Looks like the new gear sits level with where the synchro hub bottoms out. That means I can just machine off the extended lip of the synchro hub and that should solve all of my problems. Just have to find a machine shop with a toolpost grinder willing to help me out. Or I could order the “right” parts. Whatever gets done faster. Looks like the correct part would be 33362-42012, but I don’t plan to order it to find out.


Waiting for you
So I order 33362-42012. Realized it was going to cost roughly the same to get a new part as it would be to machine this one. So I took a gamble and bought it. I needed a new sleeve, so I threw it in the same order. Surprisingly it arrived pretty quickly, after only a week or so. Shiny. Unsurprisingly the 3rd gear fits, and happily the 4th gear still fits. That’s more like it. The hub fits on the gears either side, but only one way on the output shaft, beveled side forward. Just like the old one, but the bevel is smaller.


And still we stand here praying
The little tabs that stick in the side of the hubs are compatible with both, and they are not really wear items, so I decided to reuse my existing ones. they were installed after the hub was pressed on the output shaft because its easier than having to deal with them during the install. I slid the sleeve on just to check the engagement, and it worked fine. I can’t fathom why, but I decided to remove the sleeve again. The tabs flew everywhere. My garage is a mess and I was only able to find two of the three. Luckily, this part did not change between the narrow and wide cases. Since I had a spare wide case input shaft laying around, I was able to steal the bits from that. No more waiting.


For something more divine
There was one mod I wanted to try while I had this apart. The input shaft rear bearing is NSK part# 33TM01NX. 33mm ID, 80mm OD, sealed ball bearing. This part number does not exist in itself on NSK’s catalog, it seems to be a Toyota exclusive part. There are two bearings which are close in size that we can use for reference, one with a 32mm ID and 75mm OD (bearing 1), and one with a 35mm ID and 80mm OD (bearing 2). Bearing 1 in a sealed greased version has a speed limit of 6300 RPM. The unsealed variant has a limit of 11,000 RPM. Bearing 2 as a sealed greased version has a limit of 6000 RPM, and an unsealed limit of 10,000 RPM. The theoretical failure here is if the limit was exceeded, it is possible that the grease in the bearing would exceed its dropping point and in the “melted” state, leak out of the seals, with no way of fresh lubrication to enter the bearing.
Is it possible that Toyota sold cars with a rev limiter higher than what the input shaft bearings were supposed to spin? Yes. Especially with the 2ar, I will be spinning this up to 7200 RPM. Despite these not being the exact part used, they are good numbers to go off of. So, what does it take to bump this up safe to 10,000 rpm?
Our hands clasped so tightly
For one, we need to remove the seals. Good deal, no problem there. For two, we need an oil supply. This part is less trivial. Luckily in my case, the E250F (as well as any wide-diff E series transaxle) came equipped with an oil pump. This was primarily for a cooling loop for the AWD models but it serves additional functions. It supplies a pressurized oil system to a few key points on the transmission. There is a series of tubes which carry pressurized oil. One of these tubes runs right next to where I need an oil supply. Neat!


But our eyes are closed and shy
The concept is that if I could add another port right between the bearing and the gear, enough oil would make it into the bearing. The above image is actually the incorrect oil pipe for the transmission, I mistakenly installed the wide case pipe and later corrected that. The twin outlets are supposed to lubricate the shift collar. So, the choice of action here? drill a small hole in the same position axially to the empty space between the gear and bearing. After some careful calculation I chose a 1.5mm drill bit because it was the one I was looking at.


Quick spin of the drill and got the hole made. I of course poorly measured and needed to move the hole about 6mm further down than I initially drilled. Since this is steel I just tig’d the other hole shut, this stuff is stupid thin, only set the machine to maybe 30 amps and barely pressed the foot pedal. I think if I were to add a pipe like the other sections have I would have to braze it on, lest I accidentally weld it shut. We’ll see if I have premature bearing failure at which point I will make further modifications.

We move along when there's nothing left for us
Well I never thought I’d see the day, but this rebuild is finally complete. The rest of the assembly past what was listed above was just bog standard by the book assembly. Seal and torque the mid case to the bellhousing, slap 5th gear on, seal and install the OD cover. Side note on that, I ended up using an E153 overdrive cover instead of the stock E250F part. The E250F came with a stamped steel cover, rather than the cast aluminum version. While that’s completely fine and there’s no problem with it, I had this one laying around and it ends up being ever so slightly lighter than the stamped steel version. It could be argued that it’s stronger, but it’s in a zero-load location so its strengh is not even a concern.
I’m glad that’s over. I don’t want to figure this out again. I’m sure I’ll have to.
We'll move along when there's nothing left for us here.