
Commiserating Solo
The first (incredibly short) drive brought to attention a few major and a few minor problems. The biggest of which was that I couldn’t get into 1st or 2nd gear. Unsurprisingly, this was my own doing. Many months ago, as a part of this swap, I needed replacement shifter cables. Mine were torn to shreds, likely original to the car. Sadly, the 1996 RAV4 shifter cables are no longer available from the dealer. I went through every model year to check if there was a different part number that was similar, but dimensionally the same, and I found that the 1998+ RAV4 had different part numbers for the shift cables that were still available. Sweet. Well I wanted to replace the rubber bushings inside with spherical bearings, and to do so I used Frankenstein Motorworks shift cable bearings. These are intended for MR2s, and need one additional part to work in the RAV4. On the MR2s, both directional cables use the same size of bushing. On the front engine cars like RAV4, Camry, Celica, etc., there is one bushing the same size as the MR2, and one that is larger. I decided the easiest thing to do would be to make a small press-fit reducer to make the larger diameter fit the smaller diameter bearing.
The issue arose when it came time to install them, they fit onto the transmission side, they fit onto the shifter side, but they were a loose fit into the sheet metal. They otherwise fit, so I ended up 3D printing some shims so that the cables were securely fastened to the shift box. This appeared to work, the cables felt fine, and it seemed to shift well. This should have tipped me off that something was wrong, but I hadn’t yet noticed.

As it turns out, this cable swap is why I could not get into 1st or 2nd gear. I got cables from a 1998+ RAV4, with the 1996-1997 shift box, and the 1998+ had a different shifter assembly. Mine is stamped steel, the later part is injection molded plastic. Well, I called it too late to swap the cables, so the easy solution would be to swap the shifter assembly. I got my hands on one, threw it in the car, and that actually fixed the problem entirety.

A slight bonus is that it’s actually significantly less worn than my original shifter. A lot of people would probably say I’m moving in the wrong direction, that the metal part would be better. To that, I say, I saved 1.5 whole pounds off this car. It’s basically a racecar at this point. So far it’s been really great, but if I ever decide that it’s terrible I will just go back and modify the sheet metal part. I don’t suspect that will be a problem, but it’s good to know what I need to do.
The next issue that had to be addressed before continuing was fans. I had no fans mounted, it hasn’t gotten hot at all but it’s something I need regardless. I have almost zero room between the rad and header so I measured and ordered some slim profile SPAL fans. I also didn’t have room for, nor did I want to fabricate a shroud, so I zip tied the fans straight to the radiator. I believe this is actually a better setup than a shroud.


This was the most fan area I could fit using this core, and being high CFM SPAL fans I’m not concerned at all with heat management. In fact I’ll be incredibly surprised if this car gets hot. One crazy happenstance of this, the stock core support brace falls exactly in between the two fans. You can’t even plan this. If either fan were shifted 2mm either direction they would’ve collided with the brace. I took that as a sign and moved on.

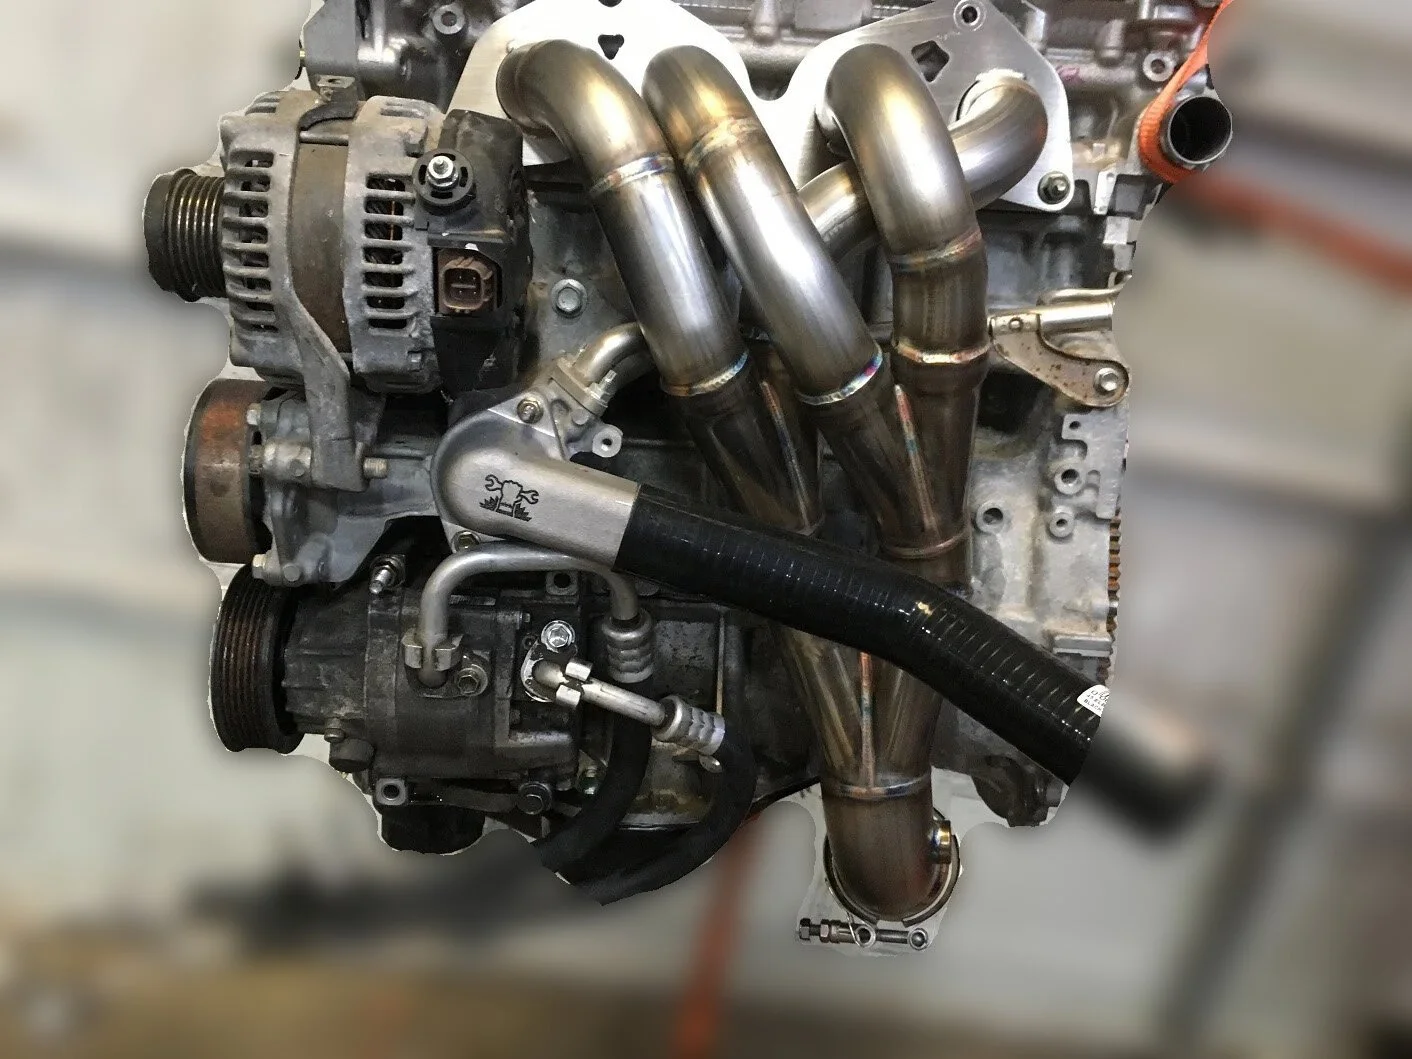
This gave way to one more issue. I couldn’t quite slot the radiator into its resting place, it seemed to be stuck on something. Turns out, it was the alternator’s 4 pin connector. Adding the fan meant there was no longer clearance for it. After some debate I decided that the best solution was to pot the connector and remote mount a different connector elsewhere.


I ended up using an A/C connector, 90980-10942 and 90980-10941. These use the same terminals that the alternator connector uses, so I simply had to depin and repin the engine harness side for this to work. No extra crimps needed.

Clearance is a premium
At this point all I had to do to make the car roadworthy was to make/hang the exhaust, and hook up the brake booster. I decided to make the exhaust first. I didn’t yet have a muffler picked out, so I went without one for now. I had a resonator welded up so that should’ve helped a lot compared to pure straight pipe. (It still sucked). Gave it a few angles to get around the gas tank, and send it out the back. This would at least get me where I was going for now.


At the same time I added an O2 sensor bung in the mid pipe. With that, off to AutoZone!
First (second) drive went well, now that I could get into the lower gears it actually drove more like a car and less like a tractor. I didn’t get on it too hard, it sounded like your neighbor’s 1995 civic with a $40 ebay exhaust at 3am. Bought the necessary vacuum hose to hook up the brake booster in the parking lot, it was nice to have power brakes again.
I was unhappy with the amount of ground clearance/breakover angle I gave myself with that exhaust. Knowing my luck I’d hit it on a rock and crack or at least ruin every exhaust component I have. Luckily I had enough clearance everywhere to cut the pipe off the back and rotate the whole assembly to tuck it under the gas tank.


That was much better. 100% improved breakover angle, with the same… straddle angle? Frankly I’m not sure what to call that direction. I chose a Vibrant Streetpower 1126, which tucked in between the frame rails nicely. Hopefully this is quiet enough, but I have a fair bit of room to add more muffler if need be.


This ended up being pretty tolerable, the wind noise is much louder than the exhaust itself. It’s not fantastic, it still has that signature Civic sound, just less eBay and more proper. Maybe a $500 exhaust instead of a $40 one.
Now that I had the car totally functional, I decided to finish looming the wiring harness. I ended up having to extend two more branches, namely the coolant temp sensor and the speed sensor. 6 wires between the two, quick job. While I had the harness out I took the time to add the firewall grommet, which I was missing before. It’s common on these new engine swaps into older cars that the grommets end up way too small to pass the wires through, as you’re running WAY more wires than the grommet originally came with. Not only that, nobody seems to be able to find a source for buying new ones. Most people end up cutting the grommet in half, wrapping it around the new harness, and calling it a day. I more or less did the same, but with two caveats.

I had this B-7000 glue laying around, it’s intended for jewelry but it’s pretty strong and slightly flexable. I gave it a shot and it actually held the grommet together really well. I also ended up filling the center of the grommet with FIPG, as a slight extra barrier against water ingress. With that, I installed the harness back in the car, and finally give it some mounts. This was pretty easy, just some 1 1/4” p-clamps bolted to the valve cover. Easy, looks fine, keeps the harness out of the way. Gotta show off that wrinkle gold wherever I can.


The next issue I wanted to overcome was the air conditioner. I had a compressor mounted and I had all of the other components needed, I just needed to make lines. However, in my mind I had been debating something. In a previous post I’d found out that a 1GR-FE AC compressor will bolt straight to a 2AR-FE AC bracket, and it’s significantly smaller than that which comes on a 2AR. However, it will still hit the stock radiator outlet, and that’s not the smallest compressor that’ll fit.
This one’s another thanks to Frankenstein Motorworks, useful for MR2 Spyder 2AR swaps. Unsurprisingly, the 2AR-FE AC compressor does not have a chance of fitting in the MR2 Spyder’s engine bay. But, the Spyder’s AC compressor is quite small, and it ended up making sense for him to make a custom bracket to mount the 1ZZ AC compressor to the 2AR. So, why not use that?


This ends up being about the most compact setup possible with the 2AR, at least with buying only off the shelf parts. Will the compressor be undersized? Let’s see. The stock RAV4 compressor used on the 3S held 102cc of PAG oil. This pretty linearly extrapolates to compressor displacement so we shall use this number to move forward. The MR2 Spyder only holds 60cc. So it’s a lot smaller. Hmm, other 1ZZ cars, the Corolla 122cc, pretty good, Celica, 102cc and already has the same connector I have on my harness. Maybe that’s the magic. I’ll keep that in the back of my mind for now, but I think I can make the Tundra compressor work too. Given the locations of it all, I thought the easiest solution would just be to get some standard compression adapter fittings, then install some 45 degree beadlock fittings/hoses and connect them to the RAV4 parts.
To make sure my thoughts will work in reality, I needed to make sure that a condenser actually fits in front of the rad. The obvious answer is to just use the stock RAV4 condenser. Logically it would move a pretty significant amount forward, since my radiator is MUCH thicker than stock. There’s not an infinite amount of clearance, but the eyeballs said there should be enough. Time to give it a go…


Well it actually all fit. I ended up having to trim two tiny plastic sections off of the condenser for it to slot into place. I needed to either add a spacer or extend the bracket by 10mm or so, but it appeared it’ll even bolt right in place. I went ahead and ordered a brand new condenser to repeat this process with, as this one has been sitting open to the elements for quite some time now.
As for the AC lines themselves, I ordered a replacement stock discharge hose to adapt to the 1GR compressor. It seems the correct fitting to adapt this hose to the compressor is a BL1316, or a #8-#10 45 degree female O-ring. This should thread into the LS swap adapters I found before, and will crimp onto the stock discharge hose. The suction hose is a bit of a can of worms. It is not long enough to reach the compressor, so even swapping the fitting wouldn’t help. I can’t seem to identify the thread for the fitting itself, it’s somewhere in the M24x1.5 or 15/16-16 range, but neither of those seem to be standard fitting thread pitches. M24x2.0 or M22x1.5 exist, I ordered both to find out. Turns out, it’s neither.


RockAuto shows that the 1996-2000 all have the same suction line. This is actually not true. My 1996 has a much longer aluminum hardline portion than Lab Coat Paul’s 1997, and the 1997 chassis side line is much longer instead, and the fitting is in front of the support bracket, rather than behind. Curious stuff. I imagine that if I had the 1997+ chassis side line with the 1996 engine side line, it might actually be long enough to reach the compressor with no further modification. Annoyingly I can’t seem to find a new early-1996 suction line anywhere. Oh well.
My next idea was to cut the ferrules off the OEM line, install new ferrules and hoses, and call it a day. Well, one issue with that. The hoses are metric. That doesn’t immediately seem like a problem, except I still have not found anywhere to buy metric hoses and fittings. Everything I’ve found has been #8, #10, or #12. The OEM suction line seems to be a 14mm hose, whereas most vehicles have a #12 or 5/8” suction line. And that’s much too big of a difference to just use a 5/8” hose and tighten a clamp. I basically had 2 options. Option #1, take the stock hardline I had and weld on a #10 beadlock fitting. Option #2, keep looking and try to find another fitting that had a fractional size hose. Of course I chose to do both. I really don’t like the idea of welding AC lines, aluminum can be very porous when welded, and refrigerants have very small molecules that can easily escape. I’d much prefer to find a direct crimp on fitting. Scoping around, it seemed that my best chance to find this fitting was by getting UAC HA11455C and cutting off the beadlock ferrule.

Finally, found an M24x1.5 fitting, and more importantly, one with a US size #12 hose attached to it. The #12 hose and fittings hadn’t arrived yet when I finally had free time to run to the crimp shop, so I took my Metric #10 abominations to get crimped. If they work, they work. If they leak, well, I’d deal with that later. I hate throwing money at problems but that seems to be how it’s going on this. I’ve bought a dozen fittings and three different sizes of AC line to find something that works. Though this did make me think of other solutions to the same problems. If this doesn’t work, I’ll try that later. I did the standard vacuum test, left it for around 30 minutes, no noticeable loss in vacuum. Filled it with R134a, call it a day. I got it down to a stable 54F coming out of the vents, with 100F ambient. I’ll take it.


I guess it’s candy time.
With this “phase” of the project over, I can finally wrap up this post. This one killed me, I think even more than the transmission rebuild. Annoying things pop up but just have to squash them and keep on truckin’. At this point this car is at a dailyable level, and can take some of that duty off of my MR2. In terms of the swap the only thing I really have left is to wire my transfer case actuator. Outside of that, the only things I have left for the original build vision is changing the tires and rebuilding the rear suspension. I may stick a locking diff in with that bunch, but I’m not sold yet. The welded diff is surprisingly pretty well mannered. I only really notice it in parking lots. I guess that’s normal but I expected it to be a little more squirrely around town, given the short wheelbase, large diameter tires, and high centre of gravity. I guess the geometry of that works out fine.
More to come.